

How to Replace RO/DI Filters Without Guessing
An RO/DI system has several filters, and they do not all wear out at the same time. The sediment filter can clog while the carbon block is still doing its job. The DI resin can exhaust even though the membrane is fine. Replacing everything once a year sounds simple, but it can waste good filters and still miss the one stage that is actually failing.
Instead, look at what the system is telling you: pressure, water production, chlorine protection, membrane rejection, and final TDS. Once you know which stage needs attention, you can replace it, put the system back together correctly, flush it, check for leaks, and test the finished water before it goes anywhere near your aquarium.
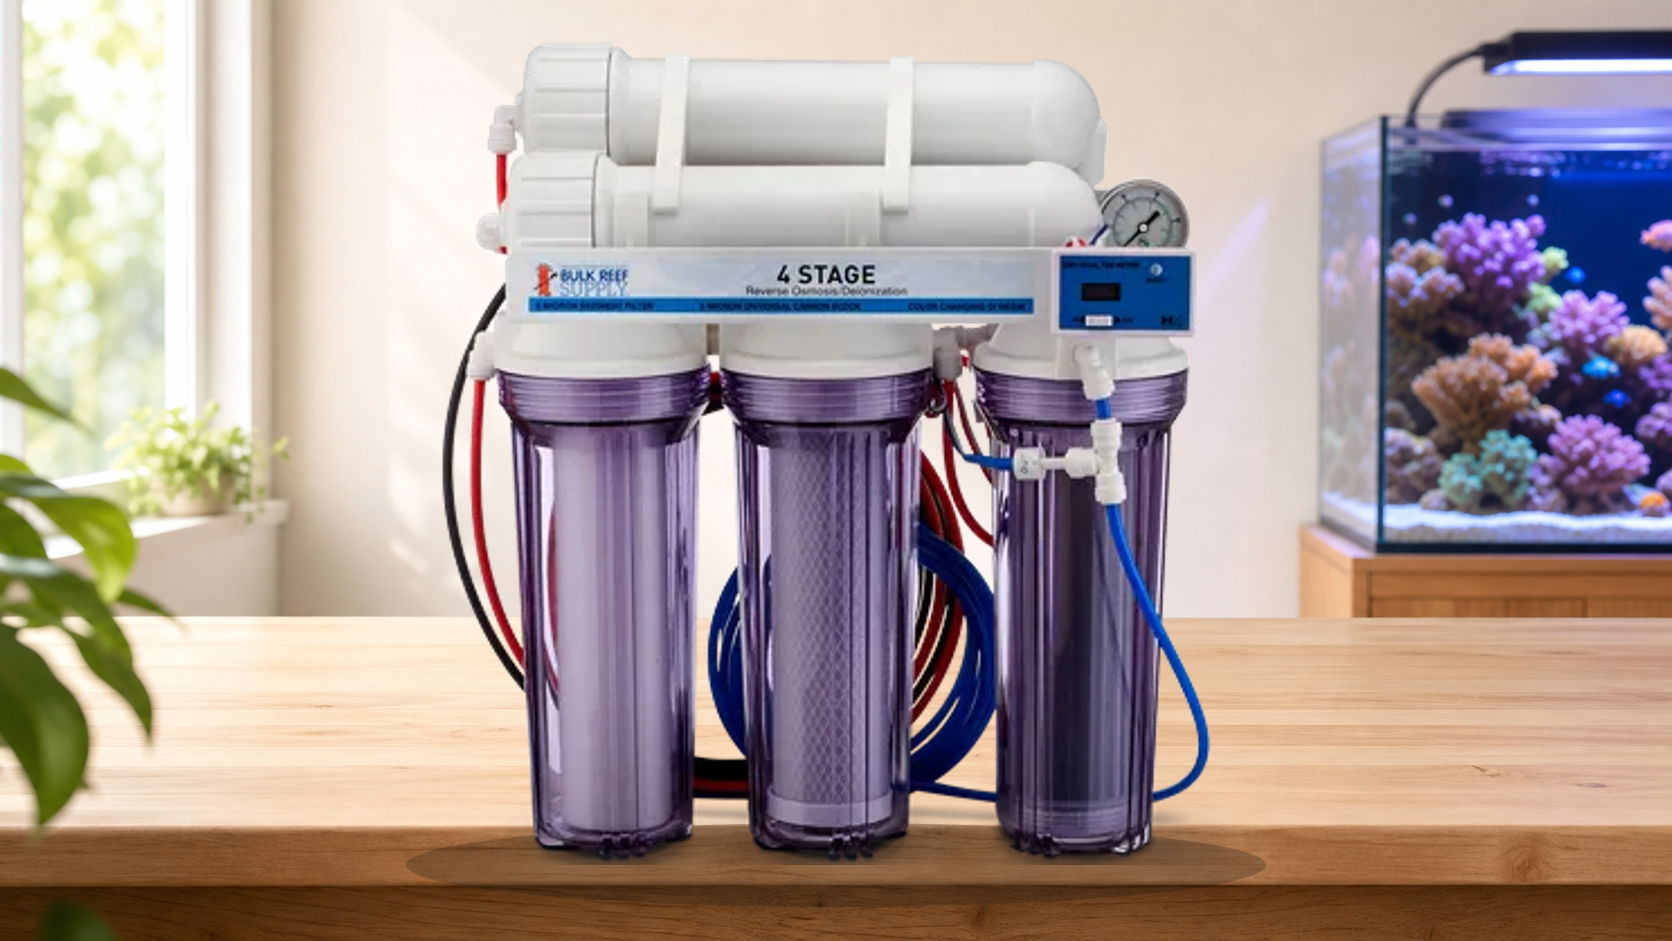
Catches dirt and particles before they clog the carbon block and membrane. Watch pressure and water production.
Protects the membrane from disinfectants such as chlorine or chloramine. Track capacity and test for breakthrough as your system directs.
Removes most dissolved material. Judge it by rejection rate under normal operating conditions—not by age alone.
Polishes the RO water to the final product-water standard. Use a TDS meter; color change is a helpful secondary clue.
Each Filter Stage Has a Different Job
| What you see | Most likely place to check first | What to measure | Do not assume |
|---|---|---|---|
| Pressure after the prefilters is falling or production is slowing | Sediment filter, then carbon-stage restriction and source pressure | Pressure at the same operating conditions; product and waste flow | A slow system automatically has a bad membrane |
| Total chlorine is detected after the carbon stage | Carbon block capacity, flow rate, cartridge selection, and installation | The system maker’s approved chlorine/chloramine test at the stated sampling point | A clean-looking carbon block is still protecting the membrane |
| Post-membrane TDS is climbing | Membrane performance, but first confirm pressure, temperature, flushing, and accurate readings | Source-water TDS and RO-only TDS; calculate rejection | Any one high startup reading means the membrane is ruined |
| Final product water rises above your established standard | DI resin, then membrane performance if the resin is exhausting unusually fast | RO-only TDS and final DI TDS after the system has stabilized | The DI cartridge’s color is more reliable than the meter |
| DI resin disappears unusually fast | Membrane rejection, high dissolved CO2, cartridge packing/channeling, and source-water changes | Rejection rate, RO-only TDS, final TDS, and service history | Buying more DI resin solves the upstream problem |
How to Tell Which Filter Is Actually Used Up
1. Sediment filter: watch pressure and flow
A sediment filter catches the visible and microscopic debris in the source water. As it loads up, it becomes harder for water to pass through. If your pressure gauge is installed after the prefilters, a drop from your normal pressure is a useful sign that the sediment stage is clogging. Slower production can be another clue, but source pressure and cold water can also slow an RO system.
Color is worth noticing, but it is not the whole diagnosis. Some source water stains a filter before it is badly restricted. Other filters can plug without looking dramatic. Compare pressure and production under similar conditions.
2. Carbon block: protect the membrane from disinfectant breakthrough
The carbon stage is not there just to make the water taste better. It protects the RO membrane from chlorine and, when the correct cartridge and contact time are used, chloramine. A carbon block can look perfectly clean after its useful chemical capacity has been consumed.
Use the test, sample point, flow conditions, and action level specified by the system or cartridge manufacturer. Also track the installation date and the approximate amount of source water processed, including waste water—not just the gallons collected in the product container. If your utility changes disinfectants or treatment practices, recheck your prefilter plan.
3. RO membrane: calculate rejection rate
The membrane should be judged by what it removes. Measure source-water TDS and the RO water immediately after the membrane but before DI. Let the system reach its normal operating pressure and flush away the startup water first, because TDS creep can make an immediate reading look worse than the stabilized result.
Compare the result with the rating and instructions for your exact membrane. Pressure, temperature, feed-water chemistry, restrictor choice, and membrane age can all affect performance. A falling rejection rate matters because every extra dissolved solid that passes the membrane becomes work for the DI resin.
4. DI resin: trust the final TDS reading
DI resin is the final polishing stage. When product-water TDS rises above your established standard after the system has stabilized, the DI stage needs attention. Color-changing resin helps you see the exhaustion front, but lighting, resin type, packing, and channeling can make color imperfect. The TDS meter is what I would trust.
If a new DI cartridge exhausts much faster than expected, do not keep changing DI without checking the membrane. High RO-only TDS, dissolved carbon dioxide, loose resin packing, channeling, and a source-water change can all shorten DI life.
Before You Open the Housings
- Read the current instructions for your exact RO/DI system and replacement cartridges.
- Photograph or label the cartridge order, tubing, flow direction, and any canister that is easy to mix up.
- Record source TDS, RO-only TDS, final TDS, operating pressure, and normal output.
- Shut off the source water, close the storage-tank valve if present, and relieve pressure exactly as directed.
- Prepare a bucket, towels, housing wrench, clean gloves, replacement O-rings if needed, and the approved sanitizer or lubricant.
- Keep soap, household spray cleaners, dirty tools, and unapproved lubricants away from every water-contact surface.
How to Replace RO/DI Filters Safely
Make sure you know which stage needs replacement
Use pressure, chlorine protection, rejection rate, final TDS, and service history. Write down what you are replacing and why.
Turn off the water and release the pressure
Turn off the source water and follow the system instructions to release pressure. A pressurized housing can spill suddenly or damage threads and seals.
Open one housing at a time
Support the housing and use the wrench only as directed. Keep the cartridge order obvious. Do not scatter wet parts across a dirty sink or floor.
Inspect and clean the housing
Remove sediment, slime, resin beads, and damaged seals. Sanitize only with the method approved for your system, and keep chemicals away from components the instructions tell you to remove.
Install the right replacement cartridge
Confirm model, micron rating, flow direction, orientation, gasket position, and cartridge order. Some prefilters are reversible; many DI cartridges and membranes are not.
Seat the O-ring and close everything carefully
Inspect the O-ring for cuts, flattening, debris, or stretching. Use only an approved lubricant if the instructions call for it. Tighten evenly without forcing plastic threads.
Turn the water back on slowly and check for leaks
Restore source water as directed. Stay with the system. Check every housing, fitting, tube, membrane cap, valve, and pressure connection before walking away.
Flush the new components
Send the initial water to the drain for the full product-specific flush. New carbon can release fines, a membrane may contain preservative, and new DI resin can release fines or produce unstable startup readings.
Test the finished water
After pressure and readings stabilize, retest source TDS, RO-only TDS, membrane rejection, and final TDS. If the carbon stage was serviced, complete the required disinfectant-protection test.
Write down the new readings
Write down the date, cartridges, lot or model, readings, pressure, output, test results, and any leak correction. Those notes make it much easier to figure out which filter needs attention next time.
Follow the Exact Cleaning and Flushing Instructions
RO/DI sanitation is not a recipe I want you copying from a different brand’s video. The safe concentration, contact time, parts that stay installed, parts that must be removed, and final rinse procedure depend on the system and its materials. Follow the current manual. Never mix cleaning chemicals.
Flushing also has more than one meaning. A flush valve changes flow across an operating membrane; it does not replace the required first-use rinse for new prefilters, a membrane shipped with preservative, or new DI resin. Route all startup water to the drain until the exact component instructions are satisfied and readings are stable.
Before You Use the Water
- Normal operating pressure for the system and source-water conditions.
- Expected product-water and waste-water flow with no kinked tubing.
- No leaks at housings, push-connect fittings, valves, gauges, or the membrane cap.
- No carbon fines, resin beads, sanitizer odor, or unusual cloudiness in the product line.
- Membrane rejection appropriate for the exact membrane after readings stabilize.
- Final product-water TDS at the standard you use for the aquarium.
- No disinfectant breakthrough after the carbon stage when that test is due.
What Changes for the Three Beginner Tanks
DeskMate 4.8
You make less water at a time, but the aquarium has almost no room for bad source water. Do not skip the final TDS check because the batch is small.
HelloReef 15
Follow the HelloReef course for the aquarium process, but service the RO/DI unit according to the water system’s own instructions. Record enough data to make the next water-change batch predictable.
JBJ RF-45
Larger batches put more total water through every prefilter and carbon block. Track gallons and source-water conditions so the service history reflects actual use.
Common RO/DI Maintenance Mistakes
Each stage has a different job and failure signal.
Disinfectant capacity can be gone while the block still looks clean.
You need RO-only TDS to judge the membrane and understand DI life.
Let pressure and readings stabilize so TDS creep does not create a false diagnosis.
More force can damage plastic threads, housings, and O-rings rather than stop a leak.
New media fines and membrane preservative belong in the drain, not the reservoir.
Leaks and mis-seated housings need to be found immediately.
Check membrane rejection, source water, carbon dioxide, packing, and channeling.
What to Do Next
Use the saltwater aquarium water-testing guide to keep source-water problems separate from aquarium test results. If the RO/DI water is ready and you are preparing a water change, continue with how to do a saltwater aquarium water change.
For the rest of the equipment that only needs attention when performance changes, return to the Long-Term & As-Needed Maintenance guide.
Frequently Asked Questions
Should I replace every RO/DI filter once a year?
No single date fits every source water, cartridge, membrane, system pressure, and amount of water produced. Use the manufacturer’s maximum service limits as boundaries, then use pressure, disinfectant protection, rejection rate, final TDS, and service history to identify the stage that is due.
Can I tell whether the carbon block is exhausted by looking at it?
No. Appearance can show sediment or discoloration, but it does not prove that the carbon still has enough capacity to protect the membrane. Use the approved test and service limits for your system and source-water disinfectant.
Why is my DI resin exhausting so quickly?
Check RO membrane rejection first. High RO-only TDS sends more dissolved material to the DI stage. High dissolved carbon dioxide, a source-water change, loose packing, or channeling can also shorten resin life.
Does color-changing DI resin replace a TDS meter?
No. Color is a useful warning, but the final product-water TDS reading tells you whether the resin is still meeting your standard.
Why is the TDS high when I first start the RO/DI system?
Water sitting around the membrane can produce a temporary high-TDS condition called TDS creep. Flush the startup water and take the performance reading after the system reaches normal pressure and stabilizes.
Can I use household soap to clean the filter housings?
Do not improvise cleaners on water-contact parts. Use only the cleaning and sanitizing method approved for the system, then rinse exactly as directed.
What if a housing leaks after I replace a cartridge?
Shut off the source water and relieve pressure. Inspect the threads, O-ring groove, O-ring condition, cartridge seating, and housing for damage. Do not keep tightening a damaged or mis-seated assembly.
When is the new RO/DI water safe to use?
Only after the required flush is complete, every leak is corrected, pressure and flow are normal, the membrane reading has stabilized, final TDS passes, and any required disinfectant-breakthrough test passes.
- Bulk Reef Supply: how to know when to change RO/DI filters
- Bulk Reef Supply: how to change RO/DI filters
- DuPont FilmTec reverse-osmosis membrane technical manual
- DuPont reverse-osmosis technical resources
This guide intentionally does not publish one universal replacement interval, sanitizer recipe, flush time, chlorine action level, membrane rejection threshold, or final-TDS rule for every RO/DI system. Use the current instructions for the exact system, membrane, cartridge, and test in front of you.