Inspiration only · Not a beginner build
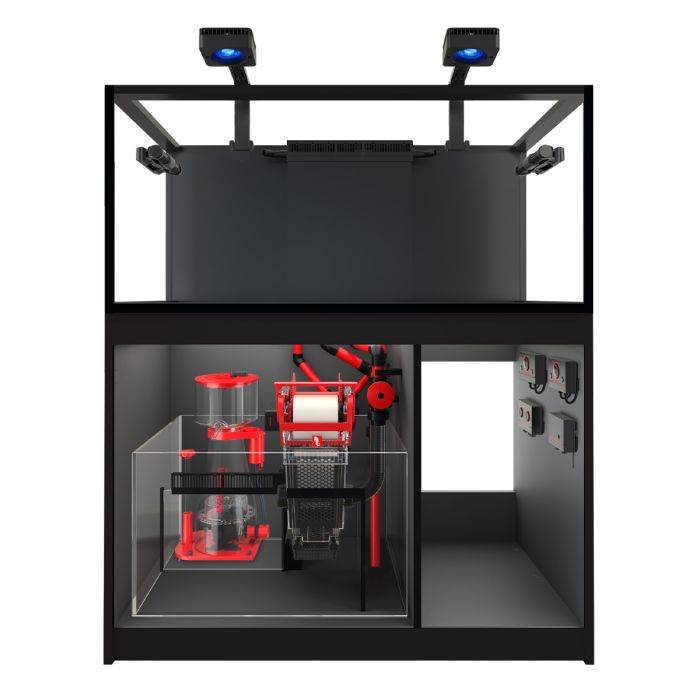
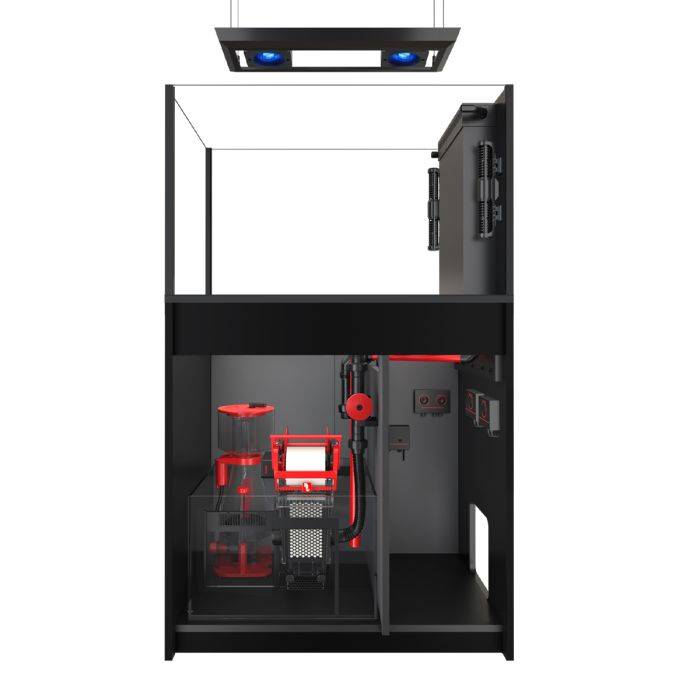
Red Sea REEFER MAX Peninsula S-950 G3: 200-Gallon Reef Inspiration
Beginners should not buy this tank. Let me be very clear about that. The Red Sea REEFER MAX Peninsula S-950 G3 is a huge, high-end reef system for an experienced hobbyist with the space, time, and budget to take it on.
That does not mean we cannot enjoy looking at it. This is a beautiful goal to work toward after you have spent a few years learning the hobby, making mistakes, and figuring out how to solve them. What follows is my inspiration for a dream reef—not a complete shopping list or a step-by-step setup course.
My verdict
A gorgeous goal for later—not your first saltwater aquarium
My favorite layout, on a completely different scale
Peninsulas are my absolute favorite. I currently have an 80-gallon peninsula, and this aquarium has 200 gallons in the display alone. It would be a showstopper, but it needs a dedicated space and someone who knows how to care for it.
If money is not a limiting factor and I was ready for a project this big, I would want excellent equipment throughout. I have not built this exact system; this is how I would start imagining it.

Who I would recommend it to
Experience matters more than owning expensive equipment
I would not personally consider this until I had at least two years of successful experience with an 80- to 100-gallon system—not just two years with a nano tank.
Learn on a smaller large reef first
I would want experience with different corals, anemones, and macroalgae. I would want to have dealt with problems, made mistakes, and learned how to keep my own system stable. Two years is my minimum recommendation, not a guarantee that someone is ready.
This is for an advanced hobbyist, or an intermediate hobbyist who has genuinely figured out their routine and understands the commitment.
Professional maintenance is another option
If you have the budget and want the aquarium without doing all the work yourself, you can hire a local fish store or aquarium-service company to install and maintain it.
I would arrange that before buying the tank. Make sure you know who handles feeding, emergencies, equipment failures, and everything between service visits.
Make room for the whole system
This needs a dedicated space
A peninsula gives you two large viewing panels. That is what I love about it: you get to enjoy your animals from both long sides. But those viewing areas and the maintenance access take up real space in your home.
Much more than the tank footprint
The display is about 78.7 inches long, 26.8 inches wide, and 25.6 inches tall. Plan the delivery route, cabinet access, room to work around both sides, and somewhere to prepare and store water.
I would have qualified professionals check the floor support and electrical plan before this much water and equipment goes into the room.
The running costs keep going
Salt, water, electricity, food, testing supplies, replacement fleece, and servicing all become a bigger commitment at this scale. A dream tank still needs routine maintenance every week.
I would also plan for leaks, power outages, and who looks after the tank when I am away.
Included equipment
It comes with a lot—but not everything
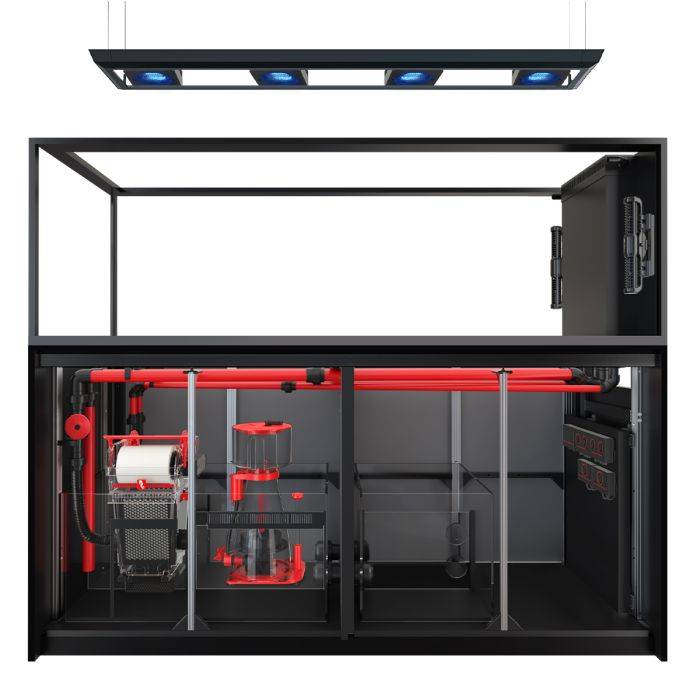
The appeal of the MAX package is that so much of the main equipment has already been chosen to work together. You get the aquarium, cabinet, sump, and plumbing, along with the lighting, circulation, and filtration.
The S-950 G3 MAX package
- Aquarium and aluminum-frame cabinet
- Split sump and pre-glued plumbing
- Four ReefLED G2 170 lights
- Pendant trays and hanging pendant
- REEFER DC 900 protein skimmer
- Two ReefWave 45 gyre pumps
- ReefRun G2 12000 return pump
- ReefRun controller
- ReefMat 1200 fleece roller
- ReefATO+ system
- Slide-Out Control Panel 60
That does not include the rock, sand, heaters, ReefControl Pro, or ReefControl Power outlet strips.
About the top-off reservoir
The S-950 has a split sump. Red Sea says you can disconnect the extension sump and use it as an RO reservoir instead of additional filtration space. That is different from having a separate dedicated reservoir supplied alongside the full working sump. I would decide which arrangement I wanted before ordering anything extra.
My dream lighting setup
Four pucks, with Blade Grow lights alongside
The four included lights are good lights. But if I was going all out on this aquarium, I would explore a hybrid: the four ReefLEDs down the middle, with two AI Blade Grow lights on each side.
That would be a custom project. I like the idea of the strips filling in the shadows around growing corals, but I would work out the fixture lengths, support, spacing, and PAR before purchasing them.

AI Blade Coral Grow — A Custom Hybrid Lighting Idea
This is the type of strip light I would explore alongside the included ReefLEDs. I have not selected a final length or verified a mounting combination. The Blade uses myAI or Mobius; it does not become ReefBeat-controlled just because the Red Sea lights are.
Explore Blade Grow lightingA concept, not a confirmed mounting kit
I would not assume the Red Sea pendant can carry additional fixtures. Have the suspension and any custom frame designed for the actual weight and layout, with clearance for ventilation and aquarium maintenance. Start with an appropriate light schedule and measure the result rather than running everything at full power.
Control and heating
I would start with the controller system
For this dream build, I would skip the Inkbird route and plan around Red Sea’s ReefControl Pro with ReefControl Power 8 Deluxe. I would budget for two Power 8 units, giving me 16 controllable outlets, and map out every connection before buying.

Red Sea ReefControl Pro
This is the controller I would start with for monitoring and sensor-based automation. Its included temperature probe can provide the reading for compatible Power outlets. The Pro itself is not an AC outlet strip.
Explore ReefControl Pro
ReefControl Power 8 Deluxe with Control Panel
I would plan for two of these, each with its own manual control panel. That gives me room to organize the heaters and other mains-powered equipment. Sixteen sockets do not mean unlimited electrical capacity.
Explore Power 8 Deluxe
BRS Titanium Heater Elements — Two 600-Watt Units
My starting concept is two separate 600-watt titanium elements, one on each Power 8, each controlled by temperature rather than a timer. Final wattage depends on the working water volume and room temperature. These elements have no built-in thermostat and must never be run without correctly configured temperature control.
View the 600W heater optionTwo heaters are not automatically two independent safety systems
I would have the final heating and electrical plan checked before installation. Each 600-watt heater draws about 5 amps at 120 volts. The US Power 8 is rated for 1,800 watts total; also follow its per-outlet limits and the limits of the supply circuit.
Two power strips on the same circuit do not create more capacity. Likewise, heaters that share one probe or controller can share a failure point. Plan independent over-temperature protection, safe failure settings, alarms, and testing with the manufacturer or installer. GFCI protection, drip loops, and dry, accessible outlets still matter.
Rock inspiration
I would mix shapes—not just buy a mountain of identical rock
This is where I would have fun. I would explore Original LifeRock, shelf rock, arches, branches, forest kits, and smaller nano pieces. I would want something interesting from both sides of the peninsula, with room for fish to swim and corals to grow.
I am not giving you a final rock weight for this tank. I could easily see considering hundreds of pounds while planning, but the finished design determines what you actually need. These are the options I would look through—not instructions to purchase every card below.

LifeRock Dry Live Rock
I would use Original LifeRock for the main structure, then mix in more interesting shapes. On a tank this size, I would expect to consider rock in the hundreds of pounds, but I would design the layout before deciding how many boxes to order.
Explore this LifeRock option
Nano LifeRock Dry Live Rock – 10 lbs
Small pieces are still useful in a huge aquarium. I would keep some on hand for little connections, nooks, and finishing touches that the larger pieces cannot give me.
Explore this LifeRock option
Shelf LifeRock Dry Live Rock
I would mix in shelf pieces to give the aquascape some flatter surfaces and different levels. I would not turn the entire peninsula into one solid wall of shelves.
Explore this LifeRock option
LifeRock Nano Reef Kit
I could see using a couple of these smaller kits for accents between larger structures. They are options for shaping the reef, not another quantity you automatically need to buy.
Explore this LifeRock option
LifeRock Reef Forest Kit with Arches
This is one of the kits I would be most interested in exploring. I like the idea of using the forest shapes as part of a larger aquascape that looks good from both long sides.
Explore this LifeRock option
LifeRock Reef Forest Extension Kit
I would consider the extension kit if I wanted to build further on the Reef Forest idea. Decide where it fits in the overall layout before adding it to the order.
Explore this LifeRock option
Arches LifeRock Dry Live Rock
Larger arches would give me ways to build openings and swim-throughs. I would leave space around them for coral growth and for cleaning the glass.
Explore this LifeRock option
Branch LifeRock Dry Live Rock
A few branch pieces would add another shape to the mix. I would use them as accents and make sure the finished structure is stable rather than balancing long pieces precariously.
Explore this LifeRock option
Shapes LifeRock Dry Live Rock
I would look through the Shapes option for more variety in the reef. The goal is an interesting structure from either side, not simply filling a 200-gallon box with rock.
Explore this LifeRock option
LifeRock Nano Arches
Smaller arches can create details that get lost when every piece is huge. I would use these where the design needs them, not because every rock product on this page has to go into the tank.
Explore this LifeRock optionBuild the structure before committing to the quantity
Lay out the design outside the aquarium first. Leave room for cleaning, water movement, and future growth. Large structures need secure joints and appropriate support—not just a tall stack of loose rock. The purple appearance of dry LifeRock does not mean the new aquarium is biologically mature.
Sand and aquascaping supplies
Even the basic materials add up at this size
I would stay with Ocean Direct Original Grade sand. My rough planning thought is ten 20-pound bags—about 200 pounds—but I would calculate the depth for the actual footprint before committing. You may need less or more for the bed you want.

CaribSea Ocean Direct Original Grade Live Reef Sand
Ten bags is my rough allowance, not a requirement to pour all 200 pounds into the aquarium. Choose the sand depth you intend to maintain, account for the rock footprint, and order accordingly.
Explore Ocean Direct sand
BRS Extra Thick Gel Super Glue — 10 Ounces
I would keep the 10-ounce BRS extra-thick gel available for smaller rock contacts and coral attachments. On a structure this large, glue is one tool—not a substitute for sound structural design.
View the 10 oz super glue
Tunze Coral Gum Instant — 400 Grams
The 400-gram Tunze Coral Gum is another adhesive I would have available for small pieces and coral mounting. Follow its instructions and use suitable structural support for large, heavy aquascapes.
View the 400 g Coral GumThe budget
Think $15,000–$20,000—and possibly more
The aquarium package alone is listed at $12,299 at BRS as of September 5, 2026. My expectation for getting a system like this set up is roughly $15,000–$20,000, with the animals bringing you closer to $20,000 or beyond.
That is an estimate, not a quote
Custom hybrid lighting, controllers, rock, sand, livestock, tax, installation work, and professional servicing can push the total higher. High-end coral choices can change the budget dramatically.
I would price the actual design with an installer before deciding that $20,000 covers it.
This is deliberately not the complete shopping list
You still need a plan for RO/DI production and storage, salt mixing, testing, maintenance tools, feeding, cycling, livestock introduction, and ongoing chemistry management.
I have not specified every one of those items here because this page is inspiration. The equipment plan should follow the reef you intend to keep and the experience you bring to it.
My final thought
A beautiful goal after you have learned the hobby
I love this tank. If I had the dedicated space, the budget, and the right support, it is exactly the kind of peninsula I would enjoy dreaming about. But I would not recommend learning the basics on it.
Start smaller, build your experience, and find out what kind of reef you actually enjoy keeping. Then come back to something like this when you know the work behind the beautiful aquarium—or when you have a professional team ready to handle it.